Atal Tinkering Labs or ATL
These are the labs which are financed by the centre government. These labs are equipped with the material and techniques which is based on the new technological world. Here students came give shapes to their innovative ideas. Here student have no limit for leaning.

ATL
Atal Tinkering Lab under Atal Innovation Mission (AIM) is Government of India’s flagship initiative to promote a culture of innovation and entrepreneurship in the country.
The objective of Atal Tinkering Lab:
- To foster curiosity, creativity and imagination in young minds
- To inculcate skills such as design mindset, computational thinking, adaptive learning, physical computing etc.
- Here students can learn 3D-Printings, connecting LED in series and parallels, Breadboard, sensor, Arduino and Resper Bi, Mechanical Tool kit, Wire soldering and many other things.
Tinker-cad It is a site which is very famous in Atal Tinkering Lab. This is very useful in making the followings
- Making soft copy for 3-D Printings.
- Making all types of electric circuits.
- Use of different types of batteries and cells in the circuit.
- Connecting electrical appliances in Series and Parallel.
- Use of Different types Arduino.
3D Printings
Learning Objectives of using 3D Printer
Application of geometric concepts:
Students can learn and apply geometric principles, such as
angles, lines, planes, and shapes, in designing and constructing 3D objects.
Measurement and scaling skills:
The objective can be to develop students' understanding of
measurements, dimensions, and scaling. They can learn to accurately measure and
scale their designs to ensure proper proportions and fit.
Material properties and selection:
Students can learn about different materials used in 3D
printing and their properties, such as strength, flexibility, and durability.
Design thinking and problem-solving:
Students can learn to identify design challenges, brainstorm
solutions, iterate their designs based on feedback, and troubleshoot issues
during the printing process.
Knowledge of 3D printing technology:
Students can gain an understanding of the 3D printing
process, including the different types of 3D printers, printing techniques, and
file formats. They can learn about the components of a 3D printer and how to
operate and maintain it.
Learning Outcomes of
using 3D Printer
Understanding of 3D modelling:
3D printing often involves
designing a digital model using specialized software.
Spatial reasoning:
Creating solid shapes in 3D
requires an understanding of spatial relationships.
Problem-solving
skills:
The process of designing and
printing 3D objects often involves troubleshooting and overcoming challenges.
STEM knowledge and
skills:
3D printing integrates various
STEM (science, technology, engineering, and mathematics) concepts. Students can
learn about geometry, measurement, scaling, and proportions while creating 3D
models.
These are the printers which can print the solid shape of the soft copy.
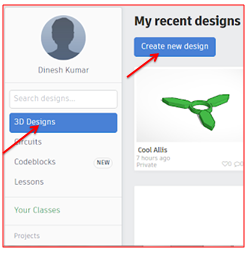
Following steps should be followed hereSearch the word Tinker-cad online.
Clink on the link given below
Fill the credential and signup for this site. Now sign in this site we see the following interface.
- Make the 3D design here with the help of tools given on the RHS
- Click on the right key to move the figure here and there.
- Select all the shapes and make adjustment and then group all the shapes with the help of the option given on the top of RHS.
- Now click on the export then on the select every thing then on the .stl file then download the file.
- Now download cura software.
Now click on the .stl file and open it in cura software.
- Upload the downloaded file in the cura software.
- Now make the adjustment of the 3D printer and save the file as gcode file.
- Copy this gcode file in the usb of the printer.
- Now open the 3D printer and click on the print, then select the file then click on ok.
- Now set temperature of the bed preheat(toward the RHS) = 60 degree and the temperature of the Nosel (Toward the LHS) = 210 degree.
- Now printing will start and wait till the completion of the project.
Connecting electrical appliances in Series and Parallel.
- Search the word Tinker-cad online.
- Clink on the link given below
- Fill the credential and signup for this site.
- Now sign in this site we see the following interface.
- Click on the circuits
- Click on the create new Circuits.
- Towards the R.H.S all equipment are given.
- Click and drag the breadboard to the work place.
- Connect 3,4, 5 or more LED in series and then connect suitable batteries
- If battery is of more power then apply resistance.
- Resistance is always connected in parallel.
LED in Series and Parallel
Arduino
- The Arduino is a Computer – a small computer
- It can run software you write on your PC – same language as Processing
- You can control real world hardware lights, motors other computers
- You can read data from real world hardware
- Temperature sensors, accelerator, GPS, A lot of things
- Can add more things called shields, network, USB, GPS, LCD Screens, Touch Screen
Blinking of 5 LED
Here also we open the Tinker cad as Previous.
On the right hand side search for Arduino U N O.
Make the connections as shown in the following figure.
Programme for Blinking of 5 LED
void setup()
{
pinMode(13, OUTPUT);
pinMode(12, OUTPUT);
pinMode(11, OUTPUT);
pinMode(10, OUTPUT);
pinMode(9, OUTPUT);
}
void loop()
{
//turn the LED on (HIGH is the voltage level)
digitalWrite(13, HIGH);
digitalWrite(12, HIGH);
digitalWrite(11, HIGH);
digitalWrite(10, HIGH);
digitalWrite(9, HIGH);
delay(1000); // Wait for 1000 millisecond(s)
//turn the LED off by making the voltage LOW
digitalWrite(13, LOW);
digitalWrite(12, LOW);
digitalWrite(11, LOW);
digitalWrite(10, LOW);
digitalWrite(9, LOW);
delay(1000); // Wait for 1000 millisecond(s)
}
Connecting Sensor with Arduino
void setup()
{
pinMode(13, OUTPUT);
}
void loop()
{
digitalWrite(13, HIGH);
delay(1000); // Wait for 1000 millisecond(s)
digitalWrite(13, LOW);
delay(1000); // Wait for 1000 millisecond(s)
}
Design Thinking
It is the process in which we design the innovate idea
Complete process of design thinking is given in the following pdf
********************************************************
ATL Project
Design Thinking
Topic Taken : Swatchh Bharat
Complete process is shown in the following pdf
Thanks for your Visit
Please comment below


Comments
Post a Comment